SLS Post-Processing: A Complete Guide to Finishing Nylon 3D-Printed Parts
Priya Mehta
Applications Engineer, Autoabode · Autoabode
Selective Laser Sintering produces some of the toughest, most isotropic plastic parts available from any additive process — but the part that comes out of the build chamber is not the part you ship. It emerges grey or off-white, coated in unfused powder, with a matte, slightly granular surface and microscopic porosity running just beneath the skin. SLS post-processing is the sequence of steps that transforms that raw sintered blank into a finished, end-use component: clean, dimensionally verified, correctly coloured, sealed where it needs to be, and smooth where the application demands it. Get post-processing right and a PA12 part rivals an injection-moulded one. Get it wrong and you scrap an otherwise perfect print at the very last stage. This guide covers every step in the chain, with the real parameters, costs and trade-offs we apply on the production floor running the SinterX Pro SLS platform in India.
Why SLS Parts Need Post-Processing at All
Unlike FDM, where the part is fused as it is built layer by layer, SLS prints sit inside a cake of loose, partially heated powder for the entire build and the cool-down that follows. That powder bed is what gives SLS its standout advantage — no support structures, full geometric freedom, nestable parts stacked in 3D — but it is also the source of every post-processing requirement. The surrounding powder must be removed, the surface energy left by partially sintered grains must be addressed, and the inherent porosity of a sintered polyamide structure must be managed for any application involving liquids, gases or cosmetic finish.
It helps to think of the raw part as having three properties you may need to modify: its cleanliness (powder still clinging to and inside the part), its surface (roughness, typically 8–15 micrometres Ra straight off the machine), and its permeability (a sintered PA12 wall is roughly 3–8% porous and will wick water). Each downstream step targets one or more of these. You rarely need all of them — a functional bracket might need only depowdering and a quick blast, while a cosmetic enclosure or a fluid-handling manifold needs the full chain.
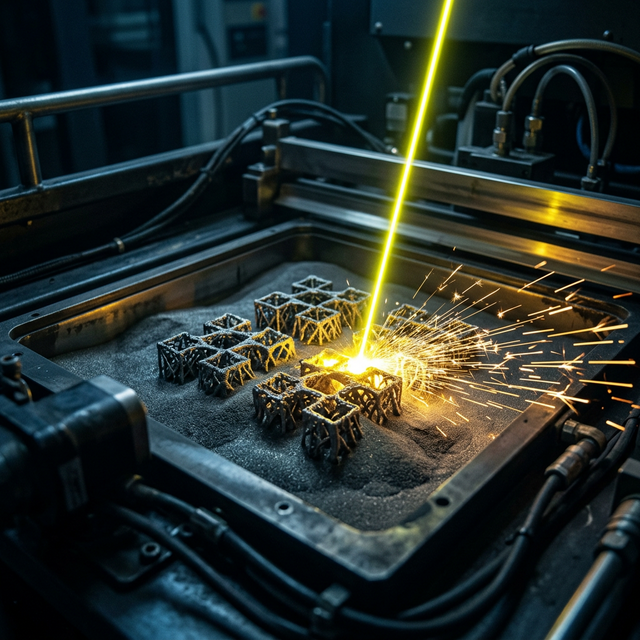
Stage 1: Breakout and Depowdering
Post-processing begins the moment the build cools. The build cake is lifted from the chamber and the bulk powder is broken away by hand — this is breakout. Parts are then individually cleaned of adhered powder, a step called depowdering. For simple geometries a soft brush and compressed air are enough; for lattices, internal channels and fine features you need bead blasting with a fine glass or ceramic media, which both cleans and gently uniforms the surface.
Recovering and refreshing powder
Depowdering is also where powder economics live. Unfused PA12 is not all reusable — thermal exposure during the build ages the surrounding powder, raising its molecular weight and degrading flow. Recovered powder is sieved and blended with virgin material at a controlled refresh ratio, typically 30–50% fresh depending on the polymer and the part-quality target. Disciplined powder management is the single biggest lever on SLS part cost; we cover it in depth in our SLS materials guide, and the SinterX Pro is built with open material handling so you are never locked into a single supplier's refresh economics.
- Breakout: remove the part from the bulk powder cake (manual, 1–5 min per part)
- Brush and air: knock off loosely adhered powder
- Bead blasting: fine glass/ceramic media for thorough cleaning and a uniform matte finish
- Channel clearing: compressed air or ultrasonic for internal passages and lattices
- Powder recovery: sieve, blend with virgin powder at the target refresh ratio, store dry
Stage 2: Surface Finishing
A bead-blasted part has a clean, uniform matte finish that is acceptable for the majority of functional applications. When you need better, several options improve it progressively, each with a cost and dimensional trade-off.
Media tumbling and vibratory finishing
For batches of small to medium parts, vibratory tumbling in a bowl or trough with ceramic or plastic media smooths edges and knocks the Ra down to roughly 4–7 micrometres over a few hours. It is cheap, scalable and hands-off, but it rounds sharp edges and is unsuitable for delicate features or parts with deep recesses the media cannot reach.
Vapour smoothing
Vapour smoothing is the step that most surprises people new to SLS. The part is exposed to a controlled solvent vapour that briefly reflows the very top layer of the surface, sealing porosity and dropping roughness to 1–2 micrometres Ra — a glossy, almost moulded look — while closing the surface to liquids and dramatically improving cleanability. It adds no measurable material and respects fine detail far better than tumbling. The trade-offs are equipment cost, a slight softening of the sharpest edges, and the need for solvent handling. For medical-adjacent, food-contact-adjacent and consumer enclosures, vapour smoothing is often the deciding factor between SLS and injection moulding for low-to-mid volumes.
Autoabode's SinterX Pro is India's first indigenous SLS 3D printer, running PA12, PA11 and TPU on one open-material platform. Designed and supported in New Delhi, it is built for production environments where post-processing throughput matters as much as print speed — predictable powder ageing, repeatable part density, and surfaces that take dye and vapour smoothing evenly. Explore the SinterX Pro, compare it against imported systems on our compare page, or book a demo to see finished sample parts in your own geometry.
Stage 3: Colouring and Dyeing
Raw SLS parts are grey-to-white, and most production parts are dyed black because black hides the slightly granular surface and resists UV yellowing. Dyeing is done by immersing parts in a heated dye bath (typically 80–95 degrees C) where the open surface porosity of the sintered polyamide draws the dye a fraction of a millimetre into the wall. This is genuinely sub-surface penetration, not a coating, so dyed SLS parts do not chip or peel the way painted parts do.
Black is the workhorse; a range of other colours is achievable but harder to keep consistent batch to batch because dye uptake depends on surface area, porosity and bath time. Where exact, repeatable brand colours or a high-gloss finish are required, spray coating or a primer-and-paint cycle is used instead — at higher cost and with the chip-resistance penalty of any coating. Dye first, smooth second is the usual order when you want both colour and a sealed glossy surface.
Stage 4: Sealing, Infiltration and Watertightness
Because a sintered nylon wall is porous, an untreated SLS part will slowly wick water and is not airtight or watertight. For housings that must keep moisture out, manifolds that carry fluid, or pneumatic components, you seal the porosity. Vapour smoothing handles the surface layer; for full-wall sealing, infiltration with a resin or specialised sealant, or an applied conformal coating, closes the structure. Designing in a slight wall-thickness margin and a compression preload at sealing faces makes these parts reliably leak-tight.
Functional secondary operations
Many production SLS parts also pick up conventional secondary operations after finishing: heat-set threaded inserts pressed into bosses for repeatable fastening, CNC facing or drilling of critical mating surfaces to tighter tolerance than the printed surface holds, and adhesive bonding of multi-part assemblies. SLS pairs well with these because the base material is genuinely engineering-grade nylon, not a brittle photopolymer. For parts where the printed tolerance is not tight enough, a hybrid approach of print-then-machine is standard practice across additive manufacturing.
Choosing the Right Post-Processing Chain
Not every part needs every step. The discipline is to specify the minimum chain that meets the requirement, because each added stage adds cost and lead time. As a rule of thumb:
- Functional internal part, cosmetics irrelevant: depowder + bead blast. Lowest cost.
- Visible functional part, matte acceptable: + media tumbling and black dye.
- Consumer-facing enclosure: + vapour smoothing after dyeing for a sealed, glossy finish.
- Fluid or air handling: + infiltration/sealing and, where needed, CNC-faced sealing surfaces.
- Tight-tolerance mating features: + post-machining of the critical faces only.
Post-processing typically accounts for 20–40% of the finished cost of an SLS part, and for cosmetic parts it can exceed the cost of the print itself. That is why it belongs in the quote and the design review from the start, not as an afterthought once the part is off the machine. When you compare an indigenous SLS printer against imported alternatives, the finishing workflow and powder economics matter as much as the headline machine price — a comparison we lay out in our SLS printers overview and the SLS 3D printer price in India breakdown.
Bringing It In-House vs Outsourcing
For low volumes, outsourcing finishing to a service bureau is reasonable. But once SLS becomes part of regular production, in-house post-processing pays back quickly: it removes shipping lead time, protects IP on sensitive geometries (a real consideration for defence and medical work), and lets you tune the chain to your exact parts. A practical first set-up is a blast cabinet, a vibratory tumbler, a heated dye bath and a fume-managed area for smoothing or sealing — modest capital against the throughput it unlocks. Autoabode helps customers commissioning a SinterX Pro specify a matching finishing line; to scope one for your parts, reach our team.
Frequently Asked Questions
Q: Do all SLS parts need post-processing?
A: Every SLS part needs at least depowdering and breakout to remove the surrounding powder cake — that is non-negotiable. Beyond that, the chain depends on the application. A hidden functional bracket may need only a bead blast, while a consumer enclosure needs blasting, dyeing, vapour smoothing and sealing. Specify the minimum chain that meets your requirement.
Q: How smooth can an SLS nylon part get?
A: Straight off the machine, roughly 8–15 micrometres Ra. Bead blasting evens it out; vibratory tumbling brings it to about 4–7 micrometres; and vapour smoothing reaches 1–2 micrometres with a glossy, sealed surface that looks close to injection moulded. Each step trades cost and a little edge sharpness for smoothness.
Q: Why are most SLS parts black?
A: Black dye penetrates the porous nylon surface evenly, hides the slightly granular texture, and resists UV yellowing better than the raw grey material. Because dyeing is sub-surface penetration rather than a coating, black SLS parts do not chip or peel. Other colours are possible but harder to hold consistent across batches.
Q: Can SLS parts be made watertight?
A: Yes. A raw sintered wall is porous and will wick water, but sealing the porosity makes parts watertight or airtight. Vapour smoothing seals the surface layer; resin infiltration or a conformal coating seals the full wall. Designing in a wall-thickness margin and a compression preload at sealing faces improves leak-tightness further.
Q: Does Autoabode make an SLS printer suited to production finishing in India?
A: Yes. The SinterX Pro is India's first indigenous SLS 3D printer and runs PA12, PA11 and TPU on one open-material platform, engineered for repeatable part density and even dye and vapour-smoothing uptake. It is built and supported in New Delhi. See the SinterX Pro and SLS materials pages, or book a demo to discuss a finishing line for your parts.
Priya Mehta
Applications Engineer, Autoabode · Autoabode Consumer Electronics Pvt. Ltd.
Expert author at Autoabode — writing at the intersection of industrial 3D printing, defence manufacturing, and advanced UAV systems. Based in New Delhi, India.
Explore Autoabode's Platforms
This article is part of Autoabode's technical journal. Learn more about our core platforms built in India for defence, aerospace, medical and industrial teams:
More from the Journal
Off-Grid Communication Solutions for Mountainous Terrain: An Engineering Field Guide for India's High-Altitude Operators
Off-grid communication solutions for mountainous terrain are not optional in India — they are the difference between a coordinated operation and a stranded section. This engineering field guide breaks down the radio physics that defeats conventional VHF/UHF in the Himalayas, the mesh architectures that survive ridge-line shadowing, and the cold-weather, power-budget and security trade-offs that determine whether a system delivers in the Karakoram and Western Ghats. Built around real deployment data from Autoabode's MeshVani encrypted communicator and MeshVani Relay platform in service with the Indian Army, ITBP, NDRF and high-altitude expedition teams.
Drones & UAV · 7 min readModular UAV Payloads for Multi-Role Missions: A Technical Guide
Explore the technical specifications and strategic advantages of modular UAV payloads for multi-role missions. This guide covers hot-swap systems, sensor fusion, and real-world applications for defense and industry.